In this article we’re going to build a simple weather forecast app with Ionic framework, an open-source front-end development kit for building cross-platform mobile apps with HTML5 and Javascript.
Forecast.io is web service that provides weather data for a given latitude and longitude.
Installation
Installing Ionic is quick and easy. To get started, I’ve summarized the installation steps below. You can find additional information here.
First, download the build of Node.js appropriate for your platform and install it, if you don’t already have it on your machine, that is. This should install NPM (Node Package Manager) as well.
Ionic runs on Linux, Mac OS X and Windows, but you’ll need to use the command line to create the app, add platforms and launch the app in an emulator or a device. For Windows users, git bash is a better alternative to the platform’s command prompt. More details can be found right here.
Next, let’s install Cordova.
$ npm install -g cordova
Finally, install Ionic.
$ sudo npm install -g gulp ionic
Ionic framework should now be successfully installed on your machine.
Now let’s create an app. From the terminal, go to your project folder. Type the following command to create a blank app with tabs.
$ ionic start weather tabs
Simply replace tabs in the above line with blank or sidemenu to create a blank app, or an application with a side menu.
Finally navigate to the project directory and add iOS and/or Android platforms to Ionic and test the app.
$cd weather
$ ionic platform add ios
$ ionic build ios
$ ionic emulate ios
That’s it! In a few lines, we’ve installed Ionic and quickly created a starter app. It doesn’t really do much at this time so let’s get to work.
Building the app
We’re building a simple app that displays current weather data for a selected city by pulling data from Forecast.io.
Our app has three pages. Page one displays the current temperature and weather conditions for a default city. The second page contains a list of cities. Selecting one of these cities will display its weather details. While the third page is a placeholder for storing app settings, we won’t be covering them in this tutorial.
Before we begin, head over to Forecast.io and signup as a developer to get your own API key for use with this walkthrough.
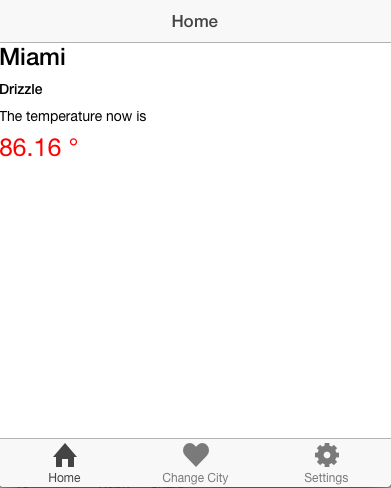
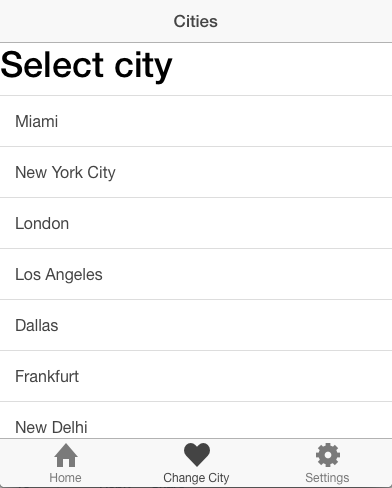
The application should look like the image below when we are done.
Screen 1 – Home:
Screen 2 – Cities
To complete the app we need to:
- Define the front end views
- Define controllers that provide data
- Define routes to tie the views to the controllers
So, let’s get started. Navigate to the folder www/templates from your application root directory. This folder contains template files that will be rendered for the app. Since we opted to use the tabs style starter app, Ionic has created some files in this folder.
To make things a bit easier, let’s modify the generated files slightly to suit our needs.
- Delete friend-detail.html
- Rename tab-dash.html to tab-home.html
- Rename tab-friends.html to tab-cities.html
- Rename tab-account.html to tab-settings.html
Replace code in tab-home.html with the code below.
<ion-view title="Home">
<ion-content class="has-header">
<!-- Display current location's weather data-->
<h3>{{city}}</h3>
<h5><weather-icon icon="current.icon" id="current-icon"></weather-icon> {{current.currently.summary}}</h5>
<p>The temperature now is</p>
<span class="large">{{current.currently.temperature}} ° </span>
</ion-content>
</ion-view>
Here we’re displaying the weather data for the current city. Current is a scope item that contains weather data returned from Forecast.io.
Save your changes. Next, open tab-cities.html and replace the code inside it with the code below to display a list of cities using ion-list.
<ion-view title="Cities">
<ion-content class="has-header">
<h1>Select city</h1>
<ion-list>
<ion-item ng-repeat="city in cities">
<span href="#" ng-click="changeCity('{{city.id}}')">
{{city.name}}
</span>
</ion-item>
</ion-list>
</ion-content>
</ion-view>
Next open tabs.html. This contains code that defines the tabs that appear at the bottom of all pages. Replace the code inside the file with the code below to link the tabs with the view templates we just modified.
<ion-tabs class="tabs-icon-top">
<!-- home Tab -->
<ion-tab title="Home" icon="icon ion-home" href="#/tab/home">
<ion-nav-view name="tab-home"></ion-nav-view>
</ion-tab>
<!-- Cities Tab -->
<ion-tab title="Change City" icon="icon ion-heart" href="#/tab/city">
<ion-nav-view name="tab-cities"></ion-nav-view>
</ion-tab>
<!-- Settings Tab -->
<ion-tab title="Settings" icon="icon ion-gear-b" href="#/tab/settings">
<ion-nav-view name="tab-settings"></ion-nav-view>
</ion-tab>
</ion-tabs>
Next, let’s define the routes. Open js/app.js and replace the code with the lines below.
angular.module('starter', ['ionic', 'starter.controllers', 'starter.services'])
.run(function($ionicPlatform) {
$ionicPlatform.ready(function() {
// Hide the accessory bar by default (remove this to show the accessory bar above the keyboard
// for form inputs)
if(window.cordova && window.cordova.plugins.Keyboard) {
cordova.plugins.Keyboard.hideKeyboardAccessoryBar(true);
}
if(window.StatusBar) {
// org.apache.cordova.statusbar required
StatusBar.styleDefault();
}
});
})
.config(function($stateProvider, $urlRouterProvider) {
$stateProvider
// setup an abstract state for the tabs directive
.state('tab', {
url: "/tab",
abstract: true,
templateUrl: "templates/tabs.html"
})
// Each tab has its own nav history stack:
.state('tab.home', {
url: '/home',
views: {
'tab-home': {
templateUrl: 'templates/tab-home.html',
controller: 'HomeCtrl'
}
}
})
.state('tab.changecity', {
url: '/city',
views: {
'tab-cities': {
templateUrl: 'templates/tab-cities.html',
controller: 'LocationsCtrl'
}
}
})
.state('tab.settings', {
url: '/settings',
views: {
'tab-settings': {
templateUrl: 'templates/tab-settings.html',
controller: 'SettingsCtrl'
}
}
});
// if none of the above states are matched, use this as the fallback
$urlRouterProvider.otherwise('/tab/home');
});
After defining templates and adding routes, we’ll create controllers. Open js/controllers.js and replace the code inside it with what’s below.
angular.module('starter.controllers', ['ionic'])
.constant('FORECASTIO_KEY', 'your forecastio key here')
.controller('HomeCtrl', function($scope,$state,Weather,DataStore) {
//read default settings into scope
console.log('inside home');
$scope.city = DataStore.city;
var latitude = DataStore.latitude;
var longitude = DataStore.longitude;
//call getCurrentWeather method in factory ‘Weather’
Weather.getCurrentWeather(latitude,longitude).then(function(resp) {
$scope.current = resp.data;
console.log('GOT CURRENT', $scope.current);
//debugger;
}, function(error) {
alert('Unable to get current conditions');
console.error(error);
});
})
.controller('LocationsCtrl', function($scope,$state, Cities,DataStore) {
$scope.cities = Cities.all();
$scope.changeCity = function(cityId) {
//get lat and longitude for seleted location
var lat = $scope.cities[cityId].lat; //latitude
var lgn = $scope.cities[cityId].lgn; //longitude
var city = $scope.cities[cityId].name; //city name
DataStore.setCity(city);
DataStore.setLatitude(lat);
DataStore.setLongitude(lgn);
$state.go('tab.home');
}
})
.controller('SettingsCtrl', function($scope) {
//manages app settings
});
In the code above, we define three controllers:
- Home: Defines two scopes, city and current. Current is data returned from an API request. City names are retrieved from DataStore factory. Here we’re calling the method ‘getCurrentWeather’ defined in factory ‘Weather’ passing in latitude and longitude.
- Locations: Controls city view
- Settings: Controls the settings view
In the home and locations controllers, we inject three factories:
- Cities
- DataStore: Stores data used across controllers
- Weather: Contains methods to access the Forecast.io API for weather data
Lastly, let’s take a look at js/services.js. This file defines services and factory objects. Factory objects allow different controllers to share the same data.
'use strict';
var forecastioWeather = ['$q', '$resource', '$http', 'FORECASTIO_KEY',
function($q, $resource, $http, FORECASTIO_KEY) {
var url = 'https://api.forecast.io/forecast/' + FORECASTIO_KEY + '/';
var weatherResource = $resource(url, {
callback: 'JSON_CALLBACK',
}, {
get: {
method: 'JSONP'
}
});
return {
//getAtLocation: function(lat, lng) {
getCurrentWeather: function(lat, lng) {
return $http.jsonp(url + lat + ',' + lng + '?callback=JSON_CALLBACK');
}
}
}];
angular.module('starter.services', ['ngResource'])
.factory('Cities', function() {
var cities = [
{ id: 0, name: 'Miami', lat:25.7877 , lgn: 80.2241 },
{ id: 1, name: 'New York City' ,lat: 40.7127 , lgn: 74.0059 },
{ id: 2, name: 'London' ,lat:51.5072 , lgn: 1.1275 },
{ id: 3, name: 'Los Angeles' ,lat: 34.0500 , lgn: 118.2500 },
{ id: 4, name: 'Dallas' ,lat: 32.7758 , lgn:96.7967 },
{ id: 5, name: 'Frankfurt' ,lat:50.1117 , lgn: 8.6858 },
{ id: 6, name: 'New Delhi' ,lat:28.6100 , lgn: 77.2300 }
];
return {
all: function() {
return cities;
},
get: function(cityId) {
// Simple index lookup
return cities[cityId];
}
}
}).
factory('DataStore', function() {
//create datastore with default values
var DataStore = {
city: 'Miami',
latitude: 25.7877,
longitude: 80.2241 };
DataStore.setCity = function (value) {
DataStore.city = value;
};
DataStore.setLatitude = function (value) {
DataStore.longitude = value;
};
DataStore.setLongitude = function (value) {
DataStore.longitude = value;
};
return DataStore;
})
.factory('Weather', forecastioWeather);
We have to make on last change before we can see the app in action. Navigate to the “www” folder and open index.html.
Next, locate the line containing
<script src="lib/ionic/js/ionic.bundle.js"></script>
Now, add the following after the line above.
<script src="lib/ionic/js/angular/angular-resource.js"></script>
That’s it. Save the file, and build and run the app from the command prompt:
$ionic build ios
$ionic run ios
ionic run ios installs the build on an ios device. If you don’t have a device on hand, you can run the app in an emulator with the following command:
$ionic emulate ios
You can also view the app in a browser. If you don’t have web server installed, you can use Python’s SimpleHTTPServer. From the terminal, navigate to the “www” folder and run the following command.
$python -m SimpleHTTPServer 3000
Now, open your favorite browser and visit http://localhost:3000 to see the app running.
Conclusion
In this article, we saw how to get started with Ionic, an advanced HTML5 framework for hybrid app development.
In future articles, we’ll take a look at enhancing the app by adding support for a remote backend with Parse.
If you’re unfamiliar with Angular, I recommended taking a look at the AngularJS docs for a better understanding of it. In the mean time, you can get this article’s source code on GitHub
Happy coding!
Author: Sriram Kota